


NAIL DELAY from Vol 2 “Secrets of Pro disc Freestyle”
Category: Beginner
Articles for the new freestyle frisbee skills player.
Throws, Catches and the basics
(PDF)
BASIC THROWS
It is very important to learn the fundamentals of throwing before trying more advanced moves. Remember to step towards your target, or at the very least to shift your weight from your back foot to your front foot while throwing. Concentrate on rotating your shoulders, hips and legs through to the point of release, and end with a natural follow through. Keep your arm straight for distance, or bend your elbow and exaggerate the snap of your wrist at the end of the throw for greater spin on the disc. Adjust the angle of your release for accurate throwing.
 The Backhand The most common throw is the Backhand release. Stand sideways toward your target, and grip the disc by placing four fingers under the rim of the disc and your thumb on top. Reach across the front of your body, then swing your arm back, releasing the disc towards your target. Tilt the outside edge of the disc down slightly (approx. 30 degrees) upon release and follow through!
 The Finger-Flip Stand sideways toward your target, and grip the disc by placing your thumb on top of the disc and the first two fingers in the rim. Much like snapping a towel, swing your arm along the side of your body, snapping the disc towards the target. More snap equals more spin. Tilt the outside rim down slightly upon release. Use your wrist snap to propell the disc, not your arm.
 The Thumber The Thumber is much like the Finger-Flip except for the grip. Stand sideways toward your target, and this time place the thumb in the rim with four fingers on top of the disc. Again, swing your arm along the side of your body, waist-high, snapping the disc toward the target. Slightly tilt the outside rim down upon release.
 The overhand wrist flip For this throw, stand facing your target. Begin with the same grip as the Thumber, then turn your arm and wrist over. With your wrist cocked backward, swing your arm above your shoulder and snap your wrist forward towards the target. Remember to keep the outside edge of the disc tilted slightly downward at the point of release.
TRICK THROWS
Trick throws can be created by modifying the throws previously described. Use momentum from spinning or pivoting to create the snap needed to throw around your back, neck or legs. Be creative and invent new throws with your friends.
UPSIDEDOWN To throw the disc upside down, use the previously shown grips. Release the disc tilted slightly upward (Approx. 30o), instead of downward.
CURVE To throw a Curve shot, simply angle the disc upon release of your throw in the direction of your desired curve. Special precautions should be made in windy conditions.
SKIP SHOTS Skip shots can be made by striking the far edge of the disc on the ground between you and the receiver of the throw. Skip shots are easiest on hard surfaces.
BASIC AND TRICK CATCHES
Catches can be made off of throws from your partner or from your own set-ups, and can be made with either hand. The disc is always spinning, so be sure to make a strong squeeze when catching. Standard catches are made with the thumb up on low catches and the thumb down on high catches. Catches can be made more difficult by spinning around before the catch is made. Below are some examples of beginning and advanced catches, but make up some of your own, that’s half the fun. Catches can be made while standing, running, sitting, lying down or jumping in the air.
Pancake |
One hand catch; High and Low |
UTL (Under the Leg) |
BTB (Behind the Back) |
Bad Attitude (Around the Extended Ankle) |
Flamingo (Around One Leg) |
Figure Four (Reverse Under the Leg) |
Behind the Head |
Chair (Around both Legs) |
Triple Fake (Around the Body) |
Phlaud (Around the far side of both Legs) |
Gitis (Around the far leg) |
TERMINOLOGY
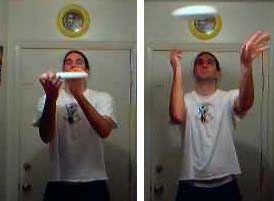
 Nail Delay – Spinning the disc on your fingernail allows you to do many things. By balancing the spinning disc in the center, you can maneuver it under your legs, around your body and set it up for catches. Move your fingernail in a small circle underneath the spinning disc. Your finger should move in the same direction of the spin. When outside always face the wind.
Note: Silicon lubricant is used to create less friction.
 Rim Delay – Similar to the nail delay, this technique involves letting the inside rim of the disc ride on your fingernail. Simply hook your finger so that your nail is the only thing making contact with the disc. This allows you to swoop the disc and create a flowing motion.
Spin – The disc spins two ways, clockwise and counter-clockwise. When the disc is thrown with a lot of spin, the flight will be more stable, and the nail delay will last longer. Also, the disc will hold an angle longer, and be more manueverable.
Percussion – Tips and kicks in the center of the disc offer many moves for the novice and professional alike. It is important to make contact as close as possible to the exact center of the disc. The action should be quick and precise for maximum control. Use your fingers, elbow, knee, head, toe or heel to pop the disc into play or to set for a catch. Experiment with trick tips under your leg, behind your back and with your feet.
Air Brushing – By hitting the disc on the outside rim with either the hand or foot, you can maintain spin and keep the disc in play. It is easiest when there is a slight breeze. Angle the disc upward into the wind and brush across the outside rim. The disc will rebound. Repeat the action or make a catch. Indoors, the brushing action can be used to pass the disc to your partner. Experiment with different hits and kicks into the wind or indoors.
Body rolls – Rolling the disc across your body is fun and easy. The most common roll is the chest roll. First of all, make sure to face the wind, then, while leaning your torso back and with the disc tilted towards you, start the roll at your finger tips. Step into the disc to maintain contact between your body and the disc throughout the roll, and watch the disc progress from one hand to the other.
Co-op – Passing the disc between players by center delay, rim delay, air brush, kicks or tips is called co-oping. For routines on the competitive level, these tricks are choreo-graphed to music.
Freestyle Competition
In competitive freestyle disc play, players organize three, four and five minute routines to music, and are judged on execution, artistic impression, variety and difficulty. Tournaments are held worldwide, and exhibitions can often be seen in schools and at special events.
For a complete listing of freestyle events, please contact the Freestyle Players Association at:
Needed Equipment
For a simple game of throw and catch, a disc is all you need. If you desire to expand your play to the nail delay and other advanced moves you might want to spray the bottom of your disc with a dry silicone lubricant. Spraying the disc will make it slick and nearly friction-less, which allows for easier nail and rim delays. Another part of the equipment needs of professional disc athletes are fake fingernails. Since real nails tend to grind down with extensive play, fake nails are used to protect the real nail and give a secure surface for the spinning disc. Other than that, the only requirements for freestyle disc play are open space and you!
Text by Rodney and Bethany Sanchez
Graphics by Gina Sample
Paul Kenny expounds on the Center Delay
Beyond throwing and catching, which are the most fundamental
tools required, initial tooling in my mind has a couple paths.
The outer rim and the center. With the center, you will want
to learn to spin the disc keeping your finger, specifically the
nail, under the center of the disc and in contact with it as
best as you can. This is called a delay. With the outer rim
you want to learn to keep the disc in the air as best you can.
This might include brushing, rolling or kicking and can involve
alot of running around. I will leave the outer rim skills to
one more proficient than I.
When I first learned to delay a disc, I had trouble. I already
knew how to spin a basketball, but had trouble figuring out how
to spin a disc. A spinning basketball, because it has so much
weight away from the center, has a stable center. When you spin
it correctly, the finger “locks” in the center. In fact, I could
spin a basketball on a pencil and hand it to just about anyone
and they could hold it spinning. With a spinning disc, the center
is not stable and the finger wants to drift off center on it’s
own. It takes very small, very quick corrections to maintain
center. It can take some time and repetition to get there.
Further complicating the development of this feel is the gyroscopic
effect intrinsic to spinning objects. When you touch a spinning
disc off center, the disc will “precess”, or turn 90 degrees
from where you touched it. Thus the small corrections discussed
above need to be in the direction of the spin. It will seem
you are always trying to catch up to the correction which wants
to stay 90 degrees ahead of your finger! This results in the
finger seeming to be doing really small circles near the center
of the disc. As you get more proficient, these “circles” and
the corrections get so small that it appears the finger is staying
still in the center of the disc!
Higher level functions such as skids and turnovers will use this
precessive property of discs in a complicated way to achieve
the moves. Skids, or “against the spin” moves work against the
prevailing precession while turnovers are done with the spin
in one direction until the turnover and then with the spin in
the other direction. What complicates it is the need to work
at non-flat angles and switching your brain from one spin’s thinking
to the other.
Paul Kenny
Going from a Rim Delay to a Center Delay
For most learning to go from a high Z rim delay to a center delay marks a whole new level of understanding in disc control. It means being able to bring most any angle throw back to the center, increased center control, and leads to understanding angle changes and off center tips. For me this skill took some practice.
To accomplish this task it helps to be able to throw a high Z steep angle to your self. To learn clock right hand throw a right handed backhand throw with tons of spin. It should come off on a steep angle, nearly perpendicular to the ground such that the bottom is pointing more downward than the top and the nose is pointing to the right. It should also be perpendicular to your chest plane. Now that the disc is in the air use your right hand and take it on a rim delay. Your palm will be facing to your left and your finger(s) should be curled under the rim. Let the disc hang in this position long enough to get it under control but not so long that it tilts around so the nose is pointing to your body. From here there are two common methods of getting to the center.
1: Give the disc an upward tug. As it lifts up hold your hand still so that the bottom of the disc rides along your finger nail(s). Once your nail is near center push hard to the left. The ideal location is it about 6 o’clock halfway between the rim and the center. As you push to the left the disc will flatten out. Once it is flat get the center delay under control.
2: Gently swing the disc forward. As the disc swings forward the rim will pull against your nail forcing the disc to level off. Once it is halfway flat move your nail to the center and gain delay control.
To learn counter left reverse the right/left directions as if looking in the mirror.
Once you become proficient at this maneuver try it on a different angle or the opposite hand. Example, once the disc is on a rim delay let it drift around on your nail until the nose is pointing upwards to the left perpendicular to your chest plane. The motions are the same. Give it a tug so it rides up your nail. Now push right at 12 o’clock between the rim and the center. It will flatten out as before. Note: you may have to duck your forearm below it to keep from knocking it off your finger.
The biggest thing to learn is that the location to press in with changes based on the direction of the nose. It’s always 90 degrees ahead of the spin from the nose. So, with clock spin, if the nose is pointing away from you (12 o’clock) push it out so the disc rides up your nail, then push towards you at 3 o’clock. With counter spin you’d push at 9 o’clock.
Once this becomes second nature try flattening the disc directly from the throw with a tip. The physics are the same. Just tip it up 90 degrees ahead of the spin from the nose. You can also try to flatten it out from a rim delay to a flat set. This set it the beginning to many moves and catches such as a scarecrow and a one and a half btb.
Jake Gauthier
Learn to Center Delay
Practice, practice, practice. 🙂
Well, beyond that, here’s what helped me in the beginning. You can do
this by yourself.
1) Develop a two handed throw to your self that is flat (parallel to the
ground) and floats down gently. Start by placing each hand on the outside
of the rim, one hand close to you, the other on the far side of the rim.
Throw your hands and arms out to the sides, popping the disc gently up in
air, about a foot or two in height above you head. Practice this skill
alone, without attempting the delay, until you get the disc to float very
horizontal and with as much spin as possible. Like a spinning top, the
more RPMs the disc starts with, the more stable and easy to control it
will be. The flatter it is, the easier it will be to balance and delay.
Once your self throws are stable, you are ready to proceed. Side note: If
your right hand is the one close to you, your spin will be
counter-clockwise. If you left hand is the one close to you, the spin
will be clockwise. One spin may be easier for you to throw and one spin
will be easier to delay at first. Make observations about your tendencies
and what works best for you.
2) Make sure the contact with the disc is with your fingernail, however
small it is (artificial nails are not necessary in the beginning). Hold
you finger, slightly bent, so that the nail itself is close to parallel
to the surface of the disc. This way the spinning disc will slide on your
nail. Apply a silicon spray lubricant to the disc to further reduce
friction between the disc and your nail. As soon as the disc contacts
flesh, there’s major friction involved, usually leading to loss of spin
and control.
3) Next, connect the above two skills. After you release the disc into
the air, reach up to the disc with your delaying hand and try to make
contact with the disc as close to the time when it is transitioning from
popping up to floating down. The disc is traveling slow at this time.
Spot the center of the disc as it’s above eye level. Keep your finger
kind of springy to absorb the contact of the disc with your finger at
this time and follow the disc’s descent with your arm to slow its further
descent. If you can keep the disc above eye level at this time, you can
continue to spot your finger on the bottom of the disc and track your
centering attempt. Eventually your eye-hand coordination will develop,
allowing you to stabilize the disc below eye level, without seeing your
finger on the bottom of the disc. A clear or translucent disc can also be
helpful at this stage.
4) Finally, make small circular motions with your arm and finger, in the
same direction that the disc is spinning. This motion will help correct
any non-horizontalness of the disc and helps you track to the center of
the disc to maintain the delay. Over time, these motions become so
refined that you will not even realize that you are making them.
Eventually you will replace step 1, with that of a throw from a partner.
Make sure your throwing partner is throwing you the same spin that you
practice with or everything will seem awry. If your partner can make a
hovering throw, again try to make contact with the disc at a point in its
flight where it is transitioning from flight to fall. Let your finger and
arm give with the disc as you receive it, acting as a shock absorber to
slow its momentum to a standstill.
The whole process is learning this eye-hand coordination. Players have
reported different lengths of time to learn the skill from less than a
week to maybe six weeks. A youthful age and athletic tendencies will tend
towards the shorter time. Practice every day for at least fifteen minutes
and you will see results of increasing delay times.
Once you’re comfortable in maintaining a delay, ask questions about the
next level you want to attain.
And most of all, have fun.
Doug Korns
#beginner
Why fake nails – or – Is it So Wrong to Wanna Jam Better?
If you are a new jammer you may have wondered why so many advanced players all tend to wear some sort of extension or fake fingernail while playing. This article will explore the reasons for wearing fake nails in the first place, the materials that can be used, and how to make/apply them properly. Hopefully, by the end of all this babbling, you will be able to make a reasonably informed decision as to whether using fake nails is right for you as a jammer.
“A fake nail will be much more durable than your natural nail.”
Why Fake Nails?
If you’ve seen jammers wearing fake nails, you may have asked yourself why anyone would glue such hideous chunks of plastic to the ends of their nails. Well, this is for a few reasons. The first is durability. As the “nail delay” is on the fingernail, your own natural nails will take a beating from the abuse that jamming can cause. A fake nail will typically be much more durable and have less friction than your natural nails. Wearing fake nails will reduce the risk of chipped, bent, or torn nails. The latter can be most painful if it occurs below the fingertip and will take weeks to properly heal.
Another reason to wear fake nails is to reduce gouging. A natural nail is thinner than most fake nails and tends to self-sharpen during play. It becomes a small gouge that will rip chunks out of a disc while tipping, pulling, or even just delaying. This self-sharpening of natural nails requires more maintenance: not only day-to-day, but throughout the course of a normal jam day. Fake nails, especially acrylic, need little to no edge attention and won’t sharpen during play.
“They will give you more extension and better penetration.”
Fake nails will give you extension beyond what a natural nail can. Depending on genetics and the amount of calcium in your diet, a natural nail gets pretty flimsy once it’s about 3/16” past your fingertip. A fake nail gives you extension beyond what a natural nail can before it starts to bend or tear (ouch!). The extension of the nail gives the wearer a couple advantages: it keeps the disc a little higher off your forearm/body while delaying and allows better penetration into the rim for rimming, sets, and pulls.
Fake nails, as mentioned above, have less friction than naturals—especially acrylic. This gives you the obvious advantage of a disc that spins faster and longer.
“You don’t wear a claw-hammer on your belt when you go dancing, do you?”
Another reason for wearing fake nails (which is a matter of personal preference) is that you can take them off at the end of the day. Although there are plenty of jammers who keep nails on 24/7, it’s not for everyone. Fake nails are necessary tools for jamming, just as a claw hammer is for effective carpentry. But you don’t want to wear your hammer on your belt when you’re out for a night of dinner and dancing with your sweetie, do you?
What are fake nails made of, and how do I get them?
Materials
There have been many types of materials and apparatus used over the years from thimbles to guitar finger picks, and from Lee Press-On nails to dental acrylic—even small seashells. Finding a product or material that you prefer can be a matter of availability and personal preference. Acrylic is perhaps the most effective material being used today, but they aren’t always easy to come by. The same goes for Swedish plastic. Still today, one of the most convenient and effective materials is the protective outer tube from Krazy Glue. Not only is this a relatively fast plastic, but it is also included in the purchase of a tube of Krazy Glue. Don’t be shy about trying new stuff to stick on the end of your nails—you could discover the next best thing to happen to freestyle since judging!
“Don’t be shy about sticking stuff to the end of your nails.”
As mentioned above, you can cut nails from the outer tube of Krazy Glue. It is soft and easy to shape, but this is also a disadvantage as it wears down over time. It also has a natural curve to it already that helps fit the curve of your finger.
Acrylic nails are not only hard and fast, but for the fashion-conscious they can come in virtually any color you desire. But getting them is a little tricky. Some are made of dental acrylic such as Yar-nails and others come from nail salons. If you know someone who is a dental technician, they can make you an exact fit. Otherwise, you will have to rely on fine- tuning the fit after they have been made. The advantage of getting acrylic nails from a salon is that they will fit perfectly to your existing nails. Some players have them made in a natural color and leave them on until they break off or grow out. Salons nails will cost more, but are quite effective.
“Hobby plastic is pretty cheap, but you’ll have to go to Europe for the Swedish Stuff”
Hobby plastic is plastic that can be purchased at most hobby/craft stores. It is basically the same material (a dense polystyrene) that plastic models are made of and can be bought in sheets of various thicknesses from .005” up to .080”. The most common thickness for fake nails is .050” (50 gauge). Hobby plastic is also quite affordable and, if a couple jammers go in on buying a package, the cost goes down even more. It does require some special handling to get a curve to fit your own nails: This technique will be covered later in this article.
As for Swedish plastic, go to more tournaments in Europe and make lots of friends—especially with the Swedish players. See if they can hook you up.
Now I’ve picked a material, how do I get them to stick?
Adhesives
The two most common methods of adhesion of fake nails are Krazy Glue (or other cyanoacrylates) and contact cement. They each have their advantages and disadvantages. Krazy Glue adheres fast, is strong, and applies in a very thin layer. For some, nails applied with Krazy Glue have a more “intimate” connection with their natural nail and feel more like a part of their body. It also comes in a very compact container so it’s easy to tote around and can be used in emergencies like when you knock over that family heirloom vase while jamming at Grandma’s house. But these adhesives have drawbacks such as: instantly gluing your fingers or other body parts to each other, the fumes will burn your eyes and nose, nails can be exceptionally difficult to remove—sometimes taking a layer of natural nail with it, and nails can just POP OFF without warning.
“Crazy Glue has a more ‘intimate’ connection”
Contact cement is much less aggressive than Krazy Glue. It is easier to remove the fake nails and won’t take a layer of nail or skin with it. The fumes are nowhere near as nasty either. And if a nail is starting to lose adhesion, you can typically tell in advance and fix the problem. But re-application will take you out of the jam for as long as 20 minutes while the glue dries. You also need to count on that 15-20 minute dry time when the nails are first applied before jamming. Contact cement is a much messier process. Even in tubes, contact cement takes up a lot of space in your nail kit and has less of a MacGiver factor than Krazy Glue. And for some, there is a sort of “mushy” feel to the nail that feels like the nail could pop off any minute, thus losing that “intimacy” gained with Krazy Glue.
The next installment of this article will be on the making, applying and maintenance of your own fake nails.
Magman
#beginner