


Matt Gauthier explains how to throw high Zzs to yourself. This is very important to be able to practice your nail delay tricks. Being able to throw as much spin to yourself as your partner can throw to you allows you to try all your combos over and over until you have them nailed. Check out Matt’s video for a in depth discussion.
Category: Learn to Jam
This is some text so I can see how this theme works.
Jam in a Line, Not in a Circle
Jamming in a Line Like Cousin Matt
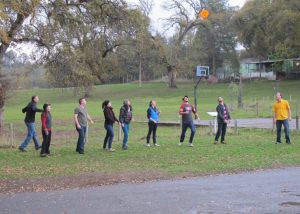
When I see a jam I can instantly get a sense for how experienced the players are in that jam even before I see a trick attempted. How? By their formation. Most new players tend to stand in a circle while in a jam. As players become more experienced they will tend to jam in a line. So, here’s a hint for the new players who try to form a circle. It is much easier to be in a line, than in a circle. Here’s why.
Imagine you are playing catch with one other person. If one of you is up wind and the other is down wind, the person down wind will have a hard time. That is because the wind will cause the disc to fly faster and drop faster. The ideal position for a game of catch is cross wind. Then both players get equal float. Now image the jam. In a circle some players will always be down wind. In fact, I’ve noticed that the newer players tend to go down wind in the circle as they hesitate to move with everyone else. They don’t realize they are making their lives harder. All the throws going down wind will be harder to handle.
Then there’s the wind shadow problem. Players upwind will be blocking the wind flow from those downwind. So, the flight of the disc will be unpredictable making it much more difficult to complete a trick.
Then there’s the mob-ob. In other words, jams often consist of players passing the disc from one to the next. Just like throws, this most easily accomplished cross wind. In fact, if everyone in the line is facing the wind, one player can set the disc out into the wind and across the jam to another player. The disc will float right in for a catch, pull, brush, or roll.

Seattle Jams in a line too!
Yes, the line is where it’s at in the jam. So what do you do as a new player? Well first realize that the most experienced players will naturally jam in a line. So don’t worry about making the other jammers uncomfortable. Now, when someone has the disc, get cross wind from them. Not to close, but not to far either. Just think of a good distance for a big Z throw. As that player moves, follow them so you stay crosswind. They may set it to you. Or they may catch. Now you are in a great position for a good throw. If they run fast into the wind, you have the option to follow them, or just hang back and wait for the next throw. Basically try to keep the line formation. If you get to far from where you started, go back and then be ready for down wind throw.
If there are many people in the jam, you don’t have to be directly next to the person with the disc. Instead just try to keep of the line formation. And note that often 2 – 4 people may go on a run. If you are part of it, stay in the line until a catch or drop. If not, stay back with the group, in line for the next throw.
Try this next time you jam. You will have more success when in a line vs being in a circle. Knowing where to be in the jam is a skill all it’s own. Please post other positional tips or questions in the comments below.
How to Tip a Frisbee, by Ryan Young
Tipping a disc is when you poke the disc with the tip of your finger to pop it back up into the air to keep it in flight. Often, this is one of the first tricks someone will learn after the basic throw and catch. One subtle difference, however, is that many people begin by tipping the disc while it is above their head with their palm facing down or out. Here Ryan shows a more advanced version with the palm up and the disc directly in front of you.
Basically, give yourself a flat throw with lots of spin. Then curl under your pointer finger, hold it with your thumb, and point the remaining finger upwards, with the palm up. Then, tip the disc in the center, over and over. Not too hard, just enough to keep it under control and in front of you.
This is a handy skill that can be placed anywhere in a series of tricks. For example, set the disc under your leg, then tip it. Also, this tip can be made more advanced by adding a restriction. Tip it under your leg, behind your back, or in a bad attitude position. If you want to see how far tipping can go, check out this video of Joey Hudoklin. Might be the most hein tipping combo ever.
The Outer Rim Delay
Paul Kenny explains the Outer Rim Delay.
In this trick, you nail delay the disc on the outside of the rim. The only more difficult nail move I can imagine is a rim delay on the top lip of the disc. Anyhow, the wind can be a key factor so be sure to face the wind before you start. Then give yourself a ton of spin. Rim delay the disc so the nose is up into the wind. With your other hand put three fingers together so the finger in the center is slightly lower than the other two. Now place your nails against the outer rim. The disc should ride in the grove created by your fingers. Try to balance it there and chase after it if it begins to fall. Note that your nails will be between 6 and 7 for clock or 6 and 5 for counter.
Once you feel comfortable with this, try landing the outer rim delay from an airbrush or off of an skid or other restricted angled set. If you can pull that off you will be one of maybe five people in the world who can, and that deserves a 10 on anyones judging sheet.
By the way, does anyone know if this move has a more official name?
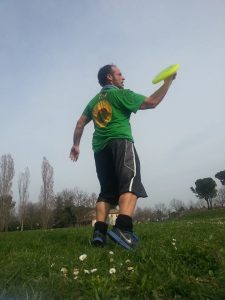
The Lacer Pull
Ryan Young demonstrates the Lacer Pull.
The Lacer pull is a great with the spin move that is easy to learn and can lead to many other consecutive moves. With clock spin, set the disc flat. Then step your left foot forward around the falling path of the disc. With your left hand, bend over and reach under your planted left leg. Watch the disc over your left shoulder and position your body, hand, and nail so the disc lands on your left nail. Now let the disc fall to the rim and do a with the spin crank so the disc comes out between your legs.
From there you can get the disc back to a center delay and/or set it up again for the next trick. Also, you can use more complex sets to get into the lacer pull, like a flat under the leg set. The lacer pull is one of the most useful tricks to have in your bag.
Ryan Shows an Advanced Combo
Think you’ve got some freestyle skill? Watch Ryan pull out this impressive combo and the post a video response. Here’s the combo, so you can go practice:
Steep clock throw to an Eagle Spotter to a behind the back turnover to a flat set, somersault to an under the leg catch.
Good luck!
Ryan Inspires By Demonstrating an Easy Combo to Practice
Ryan Young demonstrate and easy combo or series of moves that you can try to master.
Clock:
Right hand delay – Right under leg – Left under the leg – Behind the back pull – Chest roll
6 Comments
Don’t Cut Off the Discs Nose to Spite Your Jam
 The title comes from an old saying, don’t cut off your nose to spite your face. It’s basically when you do something against yourself. Well, like your face, the disc has a nose and how you treat it can make all the difference between success and failure of your next big trick.
The nose of the disc is the highest point of the rim of the disc. Unless the disc is perfectly parallel to the ground, it has a nose. And, the size of the nose refers to how verticle this disc is. A small or slight nose is where the disc is nearly parallel to the ground. So, yeah, maybe you can’t cut it off so to speak. But, where that nose is pointed can dramatically change how the disc will fly. That is, where is the nose relative to the wind.
Imagine a disc flying in the wind. As the air passes over the disc, it will push against different areas of the disc and affect it’s flight. For example, if the nose is pointing towards the wind, the wind will press against the bottom of the disc, helping to lift the disc and keep it in the air longer. If the nose is pointing down wind, the wind will press against the top of the disc and shove it quickly to the ground. If the nose is pointed cross wind then the wind may hardly touch the top of the bottom and the disc will fly more like there is no wind.
So now, imagine you are facing the wind while delaying the disc. You set the disc up into the air so you can do an under the leg pull. As you set it, your (lack of) control will dictate where the nose is pointed. What will make it the easiest to pull disc under your leg? A sight nose into the wind, of course. This will cause the disc to fall more slowly and to drift back towards you so its movement aids in the leg over process.
It’s a very important skill to know how to set any nose amount and direction that you want, but the most important will be a slight nose into the wind. So go practice this set. There are a number of ways to do it, but here are two.
Marco Prati Sets the Disc Into the Wind With Nose
From flat: for clock, take the disc on a center delay. Then lift the disc into the air. As you lift, move your finger slightly to 9 o’clock and then push to 12. The more exaggerated the movement from 9 to 12, the bigger the nose will be. Try this over and over until you can get the nose you want every time. I like to use this to set the disc and going into a spinning pull.
From the rim: for clock, on a rim delay, let the disc rotate to 3 o’clock. Now lift up and let the disc swing on the rim to 6 0’clock. The momentum from the lift will cause the disc to tilt flat. Practice the amount of lift and timing of the rim swing to get the desired nose. I find this easiest on the right hand going from the left side of my body to the right. I like to use it for a scarecrow catch.
How do you set the disc with nose? How much nose do you like for your sets? Let me know in the comments.
Matt Teaches the Rim Delay
In this video, Matt Gauthier teaches how to do a rim delay.
A rim delay is a form of nail delay, or spinning the frisbee on your finger. When most people think of the delay, they think of the frisbee balanced in the center on their finger nail. A rim delay is different. Instead, the inside rim of the frisbee is balanced against the nail. Though a rim delay does take practice to master, it can be faster to learn that the center nail delay. Yet when it is mastered, it provides an enormous depth of tricks and control over the flight of the frisbee. It is truly one of the fundamental skills of freestyle frisbee beyond throw and catch. Check the video for an indepth tutorial on mastering this skill.
Ryan Teaches us the Turbo Roll
Ryan Young explains how to perform the Turbo Roll. The Turbo Roll is a chest roll in which the first contact point propels the disc quickly across the chest. This is often used to shoot the disc far up into the sky. Ryan’s method for learning this is excellent. Watch the video for all the details.